
How to Install a 15037MN Motor on a Drive Medical 15033 or 15235 Bed
Quick answer: To install a 15037MN motor on a Drive Medical Delta Ultra-Light 15033 or 15235 hospital bed, plug the hand control into the motor, connect the optional 9V backup battery, pull off the two locking caps, and make sure the white actuating blocks are fully retracted. Hook the head end of the motor onto the flange and snap it flush to the actuator bar with the back of your hand, do the same at the foot end, then slide the locking covers back on. No tools required, and it takes about five minutes.
The first time I swapped a motor on one of these Delta beds, I spent a solid ten minutes convinced the new one was defective. It would not snap into place no matter how hard I leaned on it. Turns out the actuating blocks weren't retracted, and I was basically trying to close a drawer with a sock jammed in the track. Once I fixed that, the motor clicked on in about two seconds. So before you decide you got a bad part, read step 4. It's the one that trips everybody up.
The good news: the 15037MN is designed to come on and off by hand. Drive built these to be serviced without a toolbox, which is a rare kindness in the world of medical equipment. Here's the whole process, start to finish.
What You'll Need
- A 15037MN replacement motor (the Hi/Low motor for the 15033 and 15235 beds)
- The bed's hand control (pendant)
- A 9V battery (optional backup, sold separately)
- A working outlet nearby, in case you need to retract the actuating blocks
That's it. No screwdrivers, no wrenches, no adhesive. If you find yourself reaching for a tool, stop, because you're probably forcing something that's meant to click.
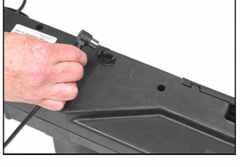
Step 1: Plug the hand control into the motor
Before the motor goes anywhere near the bed, connect the hand pendant cable to the motor. On the 15033 and 15235, this is the Hi/Low motor connection. Doing this first saves you from fishing a cable through the frame later with the motor half-seated.
Step 2: Connect the 9V backup battery
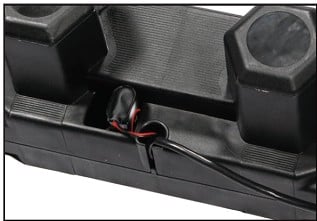
Connect a 9V battery to the battery clip on the motor. The clip lives in the recess under the motor cover. This battery is optional and sold separately, but I'd install one. With it in place, you can still lower the head and foot sections a limited number of times during a power outage, which matters a lot more at 2 a.m. than it does on the day of install.
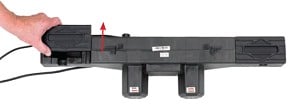
Step 3: Remove the locking caps
Pull the locking caps off the top of the motor. There are two of them, and they slide right off. Set them somewhere you'll remember, because they go back on at the very end and they're easy to lose in the sheets.
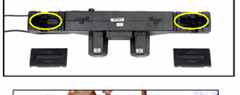
Step 4: Make sure the white actuating blocks are fully retracted
Look at the two white actuating blocks on the motor. They both need to be in the fully retracted position before the motor will seat. If either one is sticking out, plug the motor into an outlet, grab the hand control, and hold the head and foot DOWN buttons until both blocks pull all the way in.
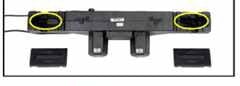
Real talk: This is the step I skipped, and it cost me ten minutes and a bruised ego. If the motor won't snap flush later, it's almost always because a block isn't retracted. Do this now and thank yourself in a minute.
Step 5: Hook the head end onto the flange
Line up the opening on the head end of the motor with the flange on the head section of the bed, then slide that flange into the motor compartment. The actuator bar is your landmark here, so aim the opening straight at it.
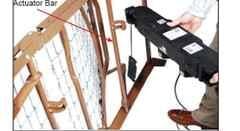
Step 6: Snap the head end flush to the actuator bar
With the back of your hand, push the motor until it snaps flush against the actuator bar. Use the back of your hand, not your fingertips, so you get a flat, even push and keep your knuckles out of the pinch points. You'll feel it seat.
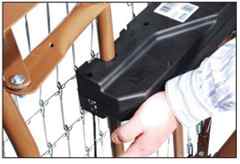
Step 7: Repeat at the foot end
Now do the same thing at the other end. Align the opening on the foot end of the motor with the flange on the foot section of the bed, insert the flange into the motor compartment, and snap it flush to the actuator bar with the back of your hand. Same motion, opposite end.
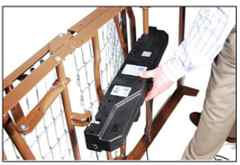
Step 8: Slide the locking covers back on
With the motor seated at both ends, slide the locking covers back onto the motor. These are what hold everything in place, so don't skip them. Once they're on, the motor is installed and ready to test.
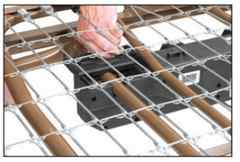
Here's what it looks like fully installed, covers on, sitting flush in the frame:
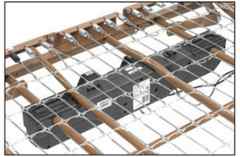
Pro tip: Before you walk away, run the bed through a full cycle with the hand control, head all the way up and down, foot all the way up and down. If anything binds or the motor strains, pop the covers and re-check that both ends snapped fully flush.
Frequently Asked Questions
Do I need any tools to install the 15037MN motor?
No. The 15037MN is designed to snap on and off entirely by hand. If you're reaching for a screwdriver or wrench, something isn't lined up right, so stop and re-check the alignment instead of forcing it.
Which beds does the 15037MN motor fit?
The 15037MN is the Hi/Low replacement motor for the Drive Medical Delta Ultra-Light 15033 and 15235 full-electric hospital beds.
The motor won't snap flush. What am I doing wrong?
Nine times out of ten, the white actuating blocks aren't fully retracted. Plug the motor into an outlet, hold the head and foot DOWN buttons on the hand control until both blocks pull all the way in, then try seating the motor again.
What is the 9V battery for, and do I need it?
It's a backup. With a 9V battery clipped in under the motor cover, you can still lower the head and foot sections a limited number of times if the power goes out. It's sold separately and technically optional, but it's cheap insurance and I'd install one.
Where can I buy a replacement 15037MN motor?
We stock it. You can grab the 15037MN Delta motor replacement right on our site, and it ships free.
That's the whole job. Once you've done it once, the next swap takes about two minutes, and you'll never again mistake a retracted-block problem for a defective motor. If you get stuck, give us a shout, we'd rather answer a quick question than have you wrestling a motor at midnight.
— The HME Parts Team